Controlling an Elegoo Mars Pro remotely
One of the main things I missed on my Elegoo Mars Pro 3D Printer was remote access over WiFi. I wanted to upload files, print and keep track of print status while I’m away from the printer. Luckily, the Elegoo Mars Pro exposes a serial port on some of its motherboard pins, allowing for it to be controlled with a Raspberry Pi Zero W. I wrote a software called mariner for controlling it over HTTP and here I document my current setup.
Disclaimer: this software and instructions are provided “as is”, without warranty of any kind. There is no guarantee this will work on your printer, nor that it won’t damage it. Do and use it at your own risk. You should also keep the software behind a firewall. If you need authentication you should set it up with a reverse proxy, as there is no support for authentication on
mariner.
What it looks like#
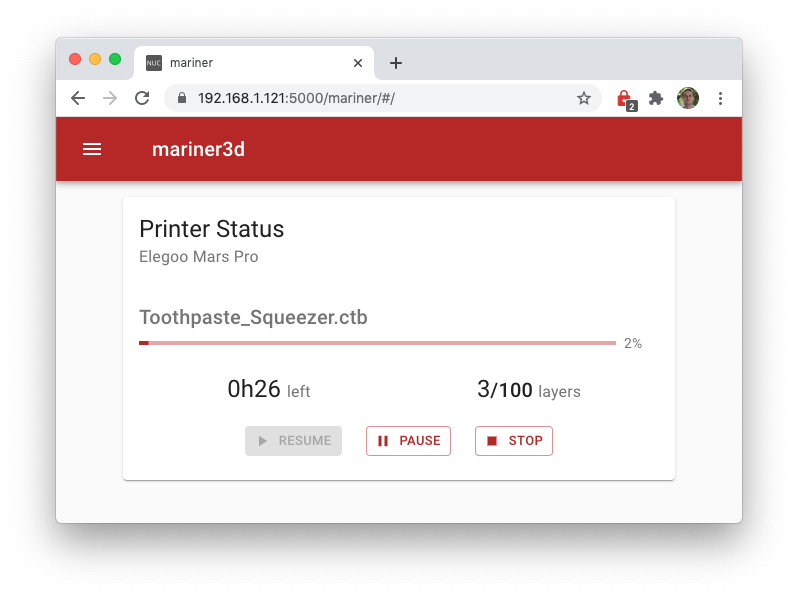
As of this writing, mariner supports desktop and mobile browsers and can:
- Upload files to be printed.
- Check print status: progress, current layer, time left, etc.
- Control the printer: start prints, pause/resume and stop.
- Browse files available for printing.
- Inspect
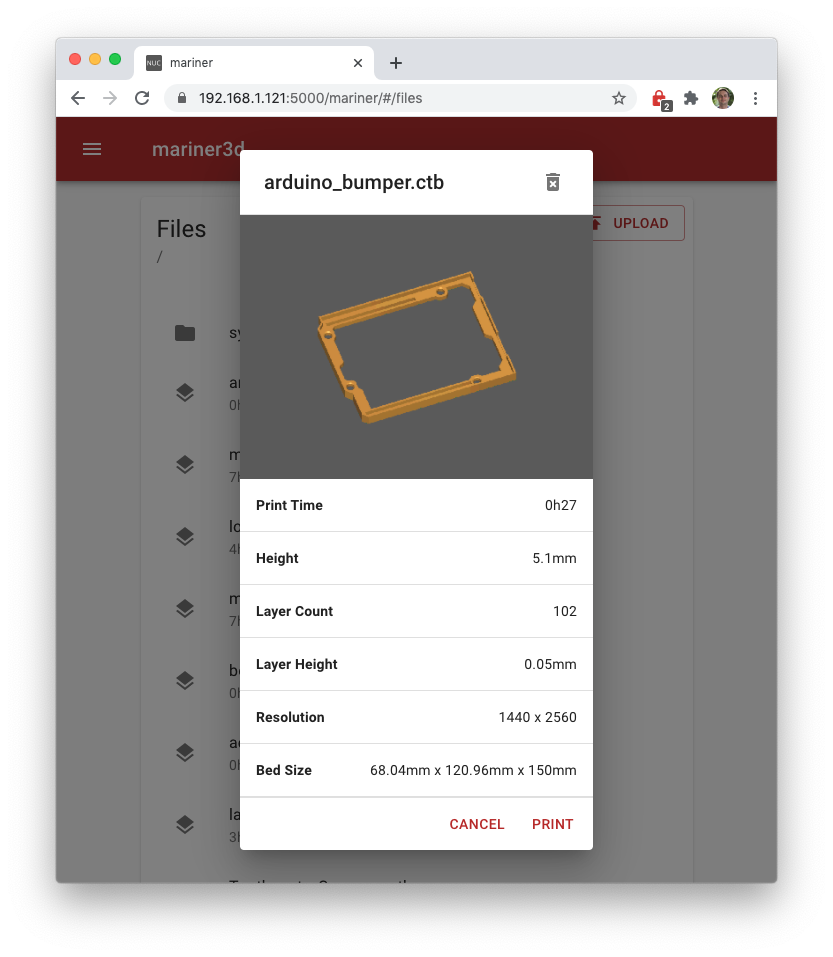
.ctbfiles: image preview, print time and basic slicing settings.
This is what the interface looks like while printing something:
The Elegoo Mars Pro has a lot of room inside, so I was able to put all the required components inside the case. The printer itself looks like a standard Elegoo Mars Pro, but with remote access over WiFi!
Once you do this mod, the external USB port of your printer won’t be usable since the port will be used by the Raspberry Pi (it is a reversible process though).
Parts List#
In order to do this mod, you will need:
- Raspberry Pi Zero W: …obviously. [Adafruit]
- Micro SD Card: for the Pi. I use a 32GB SanDisk Ultra microSDHC UHS-I card. But even a 8GB card should be sufficient.
- Micro USB to USB-A cable: to connect the Pi to the printer motherboard. You probably have plenty of these.
- Some Male Pin Headers:
- Some Jumper Wires: for connecting the motherboard’s serial port to the Pi. [Adafruit]
- Some Heatshrink: optional, but always good to keep things organized. [Adafruit]
- Power Supply for the Pi: there’s two options here:
- External Power Supply: You can use your Pi Power Supply as usual and leave a cable going out from the back of the printer.
- Use the Printer’s Power Supply: this leaves you with a clean build, since there’s no cables from the back of the printer. You can use a 12V to 5V DC buck converter module. The 12V line of the printer is easily accessible from the 12V connector on the motherboard. I used this converter module [Amazon], which required me to salvage an old Micro USB cable and solder it to the buck converter. There are other buck converters which come with a Micro USB cable on them [Amazon] which should work, but I haven’t tested those myself.
Preparing the printer#
Elegoo has a good video on how to replace the printer’s motherboard, so I won’t get into details about how to disassemble the printer and remove the motherboard. You can watch this video on YouTube for details on that.
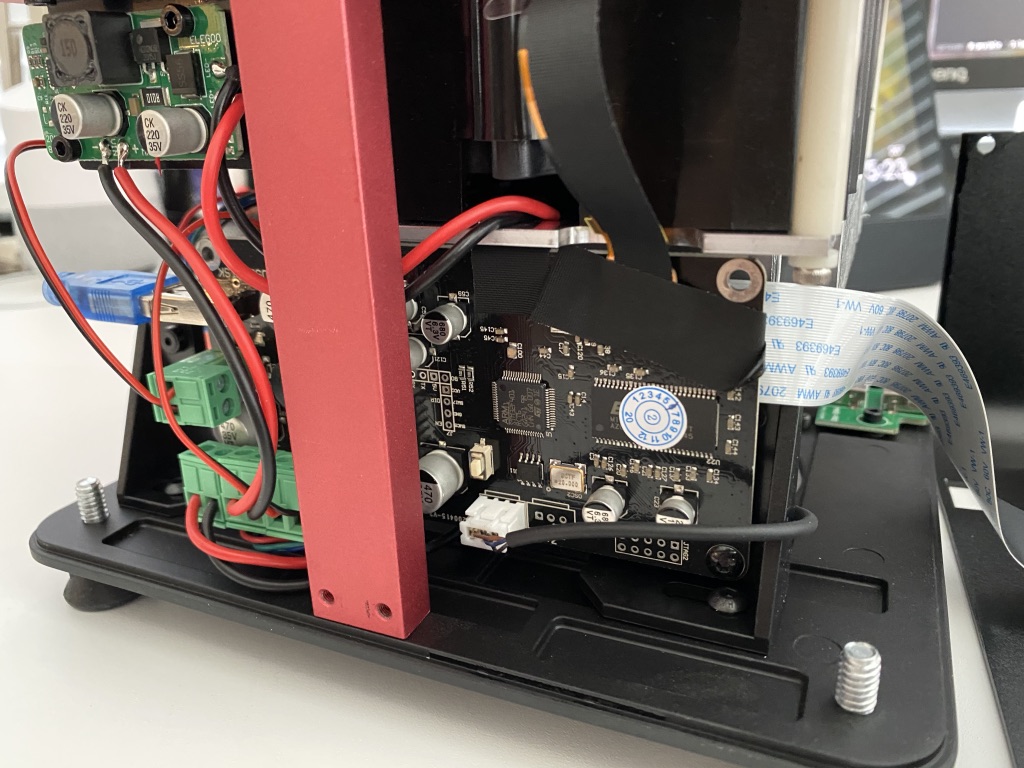
This is what my printer looked like inside:
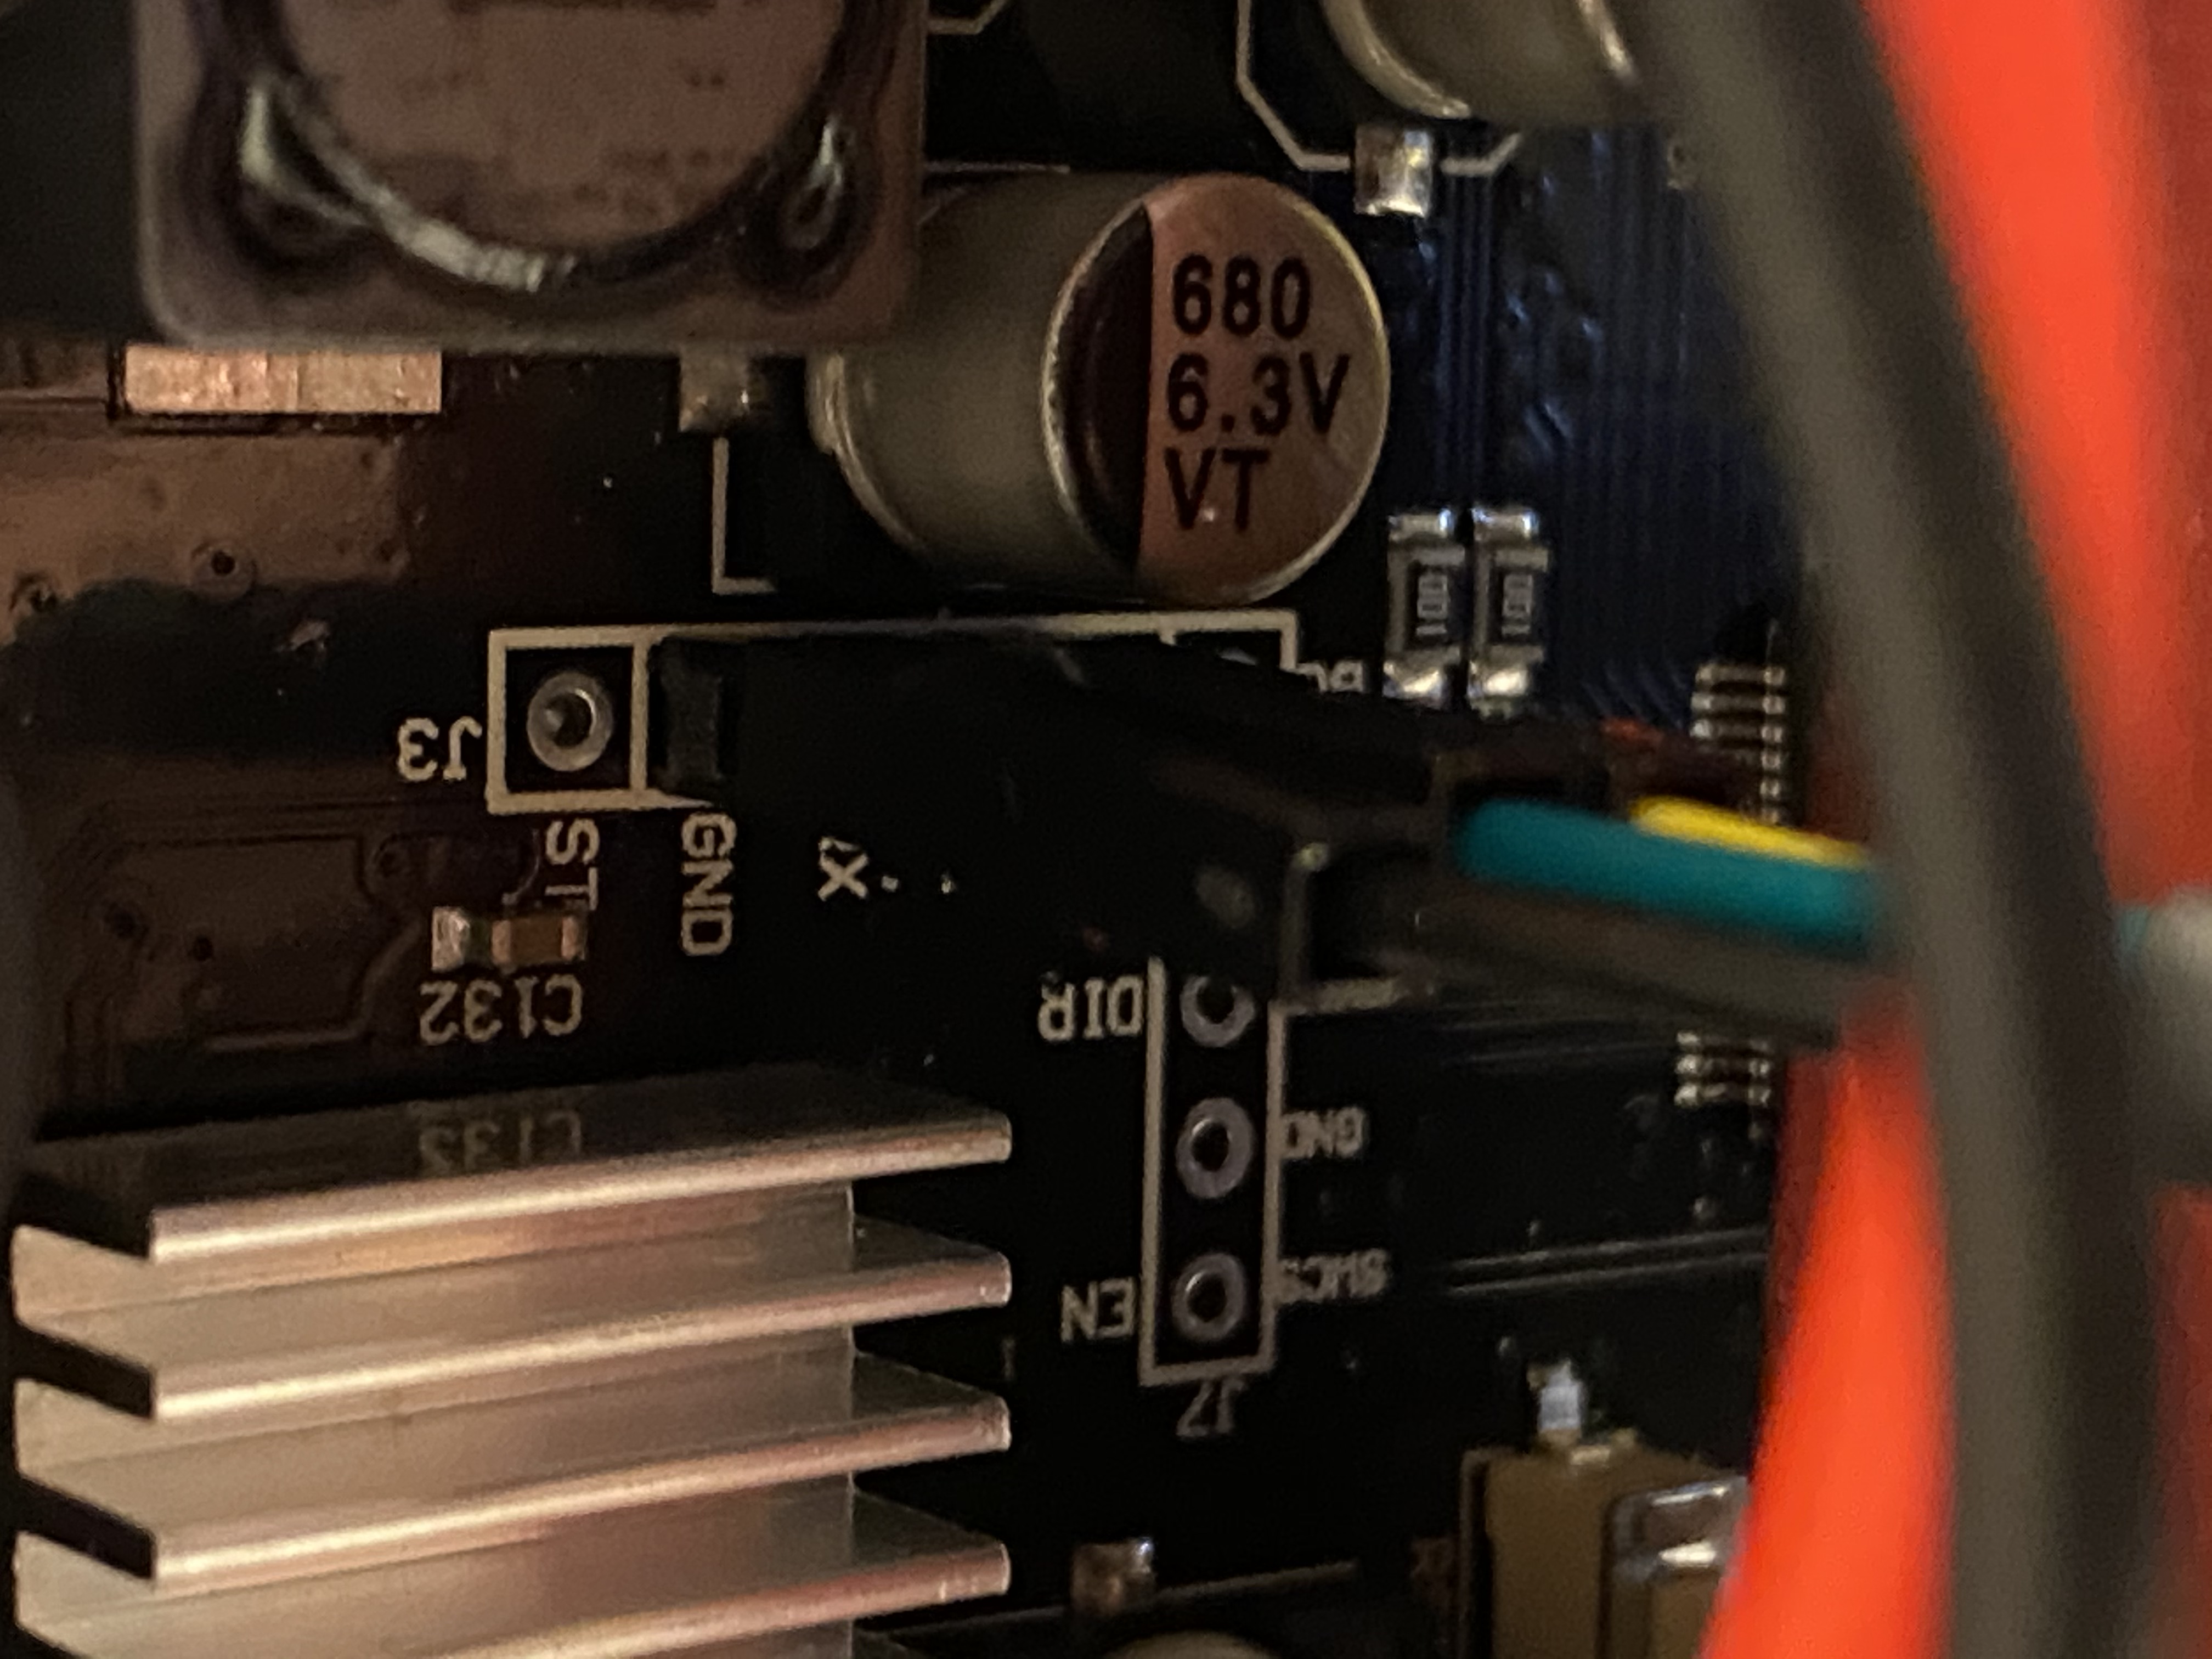
Once you remove the motherboard from the printer, you can see there are pins exposing the serial port right in the middle of the board. Look for the pins labeled GND, RX, TX. You will have to solder male pin headers to those:
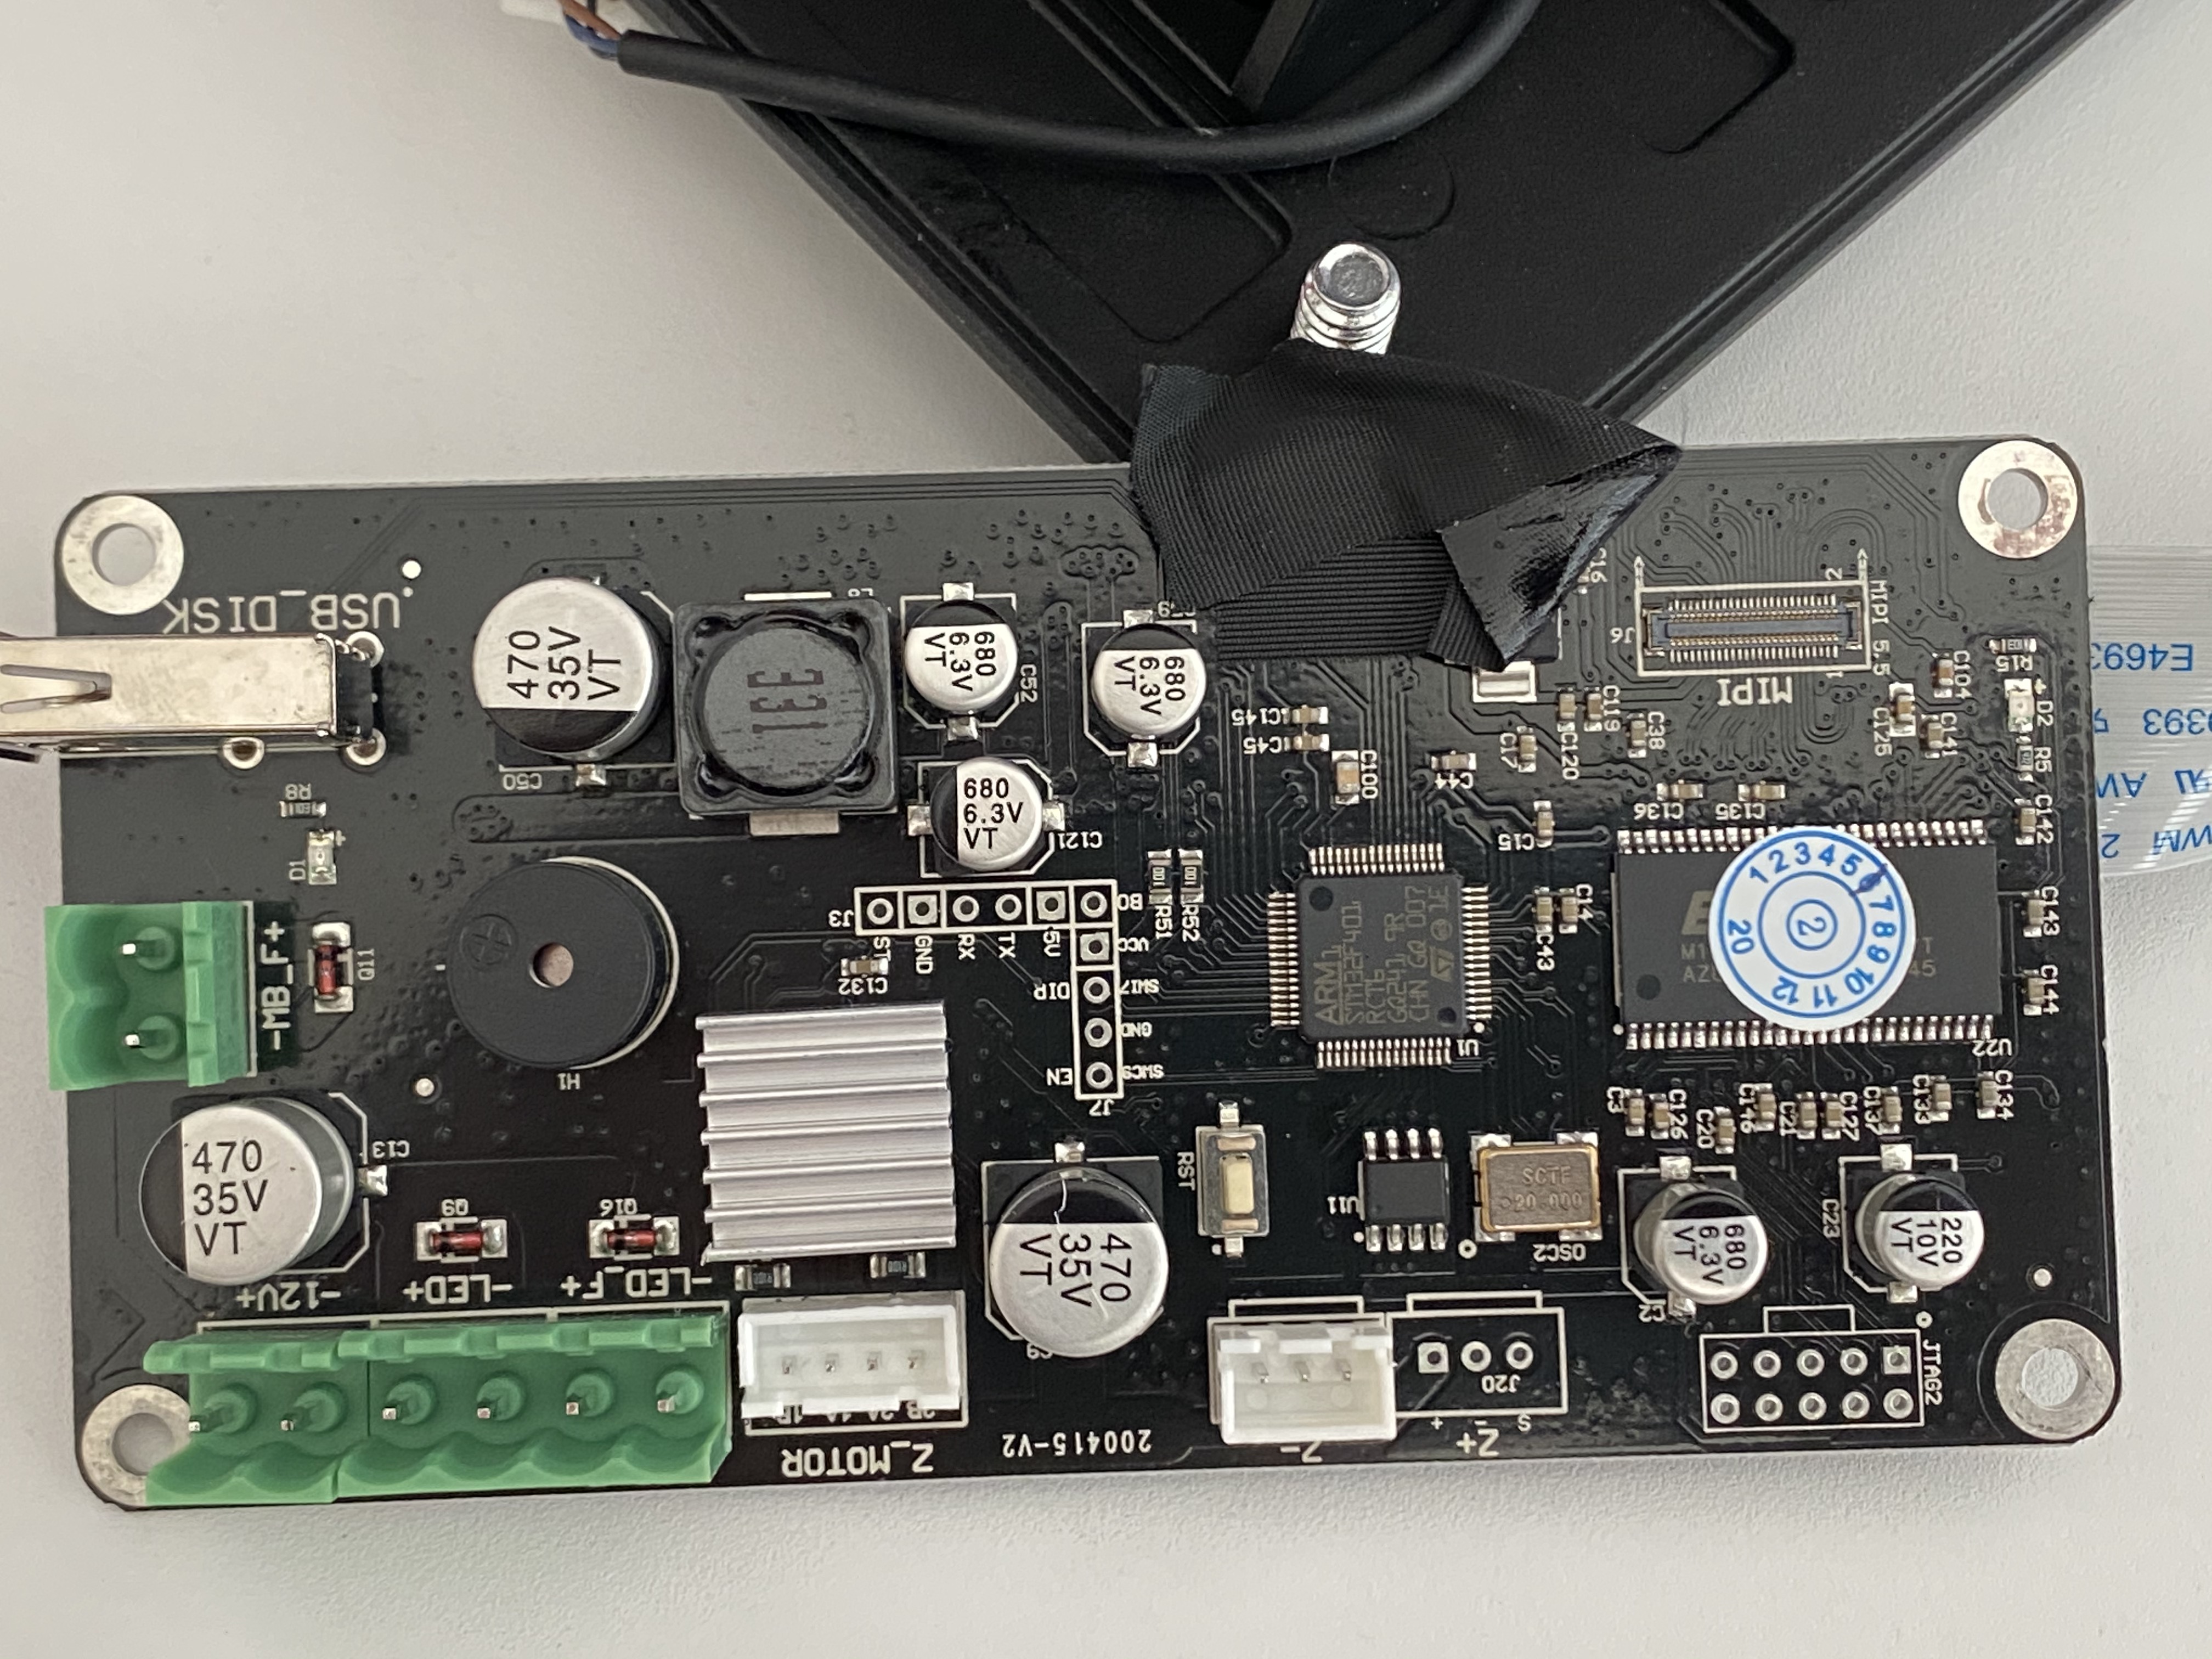
Note that you don’t want to connect the 5V line, so you don’t need to solder a header to it. Just GND, RX and TX. Once you have those three pins soldered, plug the jumper wires to the pins you just soldered and put the motherboard back into the printer (it’s harder to plug the jumper wires in once you have placed the motherboard back into the printer):
Preparing the Raspberry Pi Zero W#
If you don’t have a male pin header on your Pi, first solder them in.
Connecting the Pi to the printer’s serial port#
You should connect the wires from the motherboard to your Pi like this:
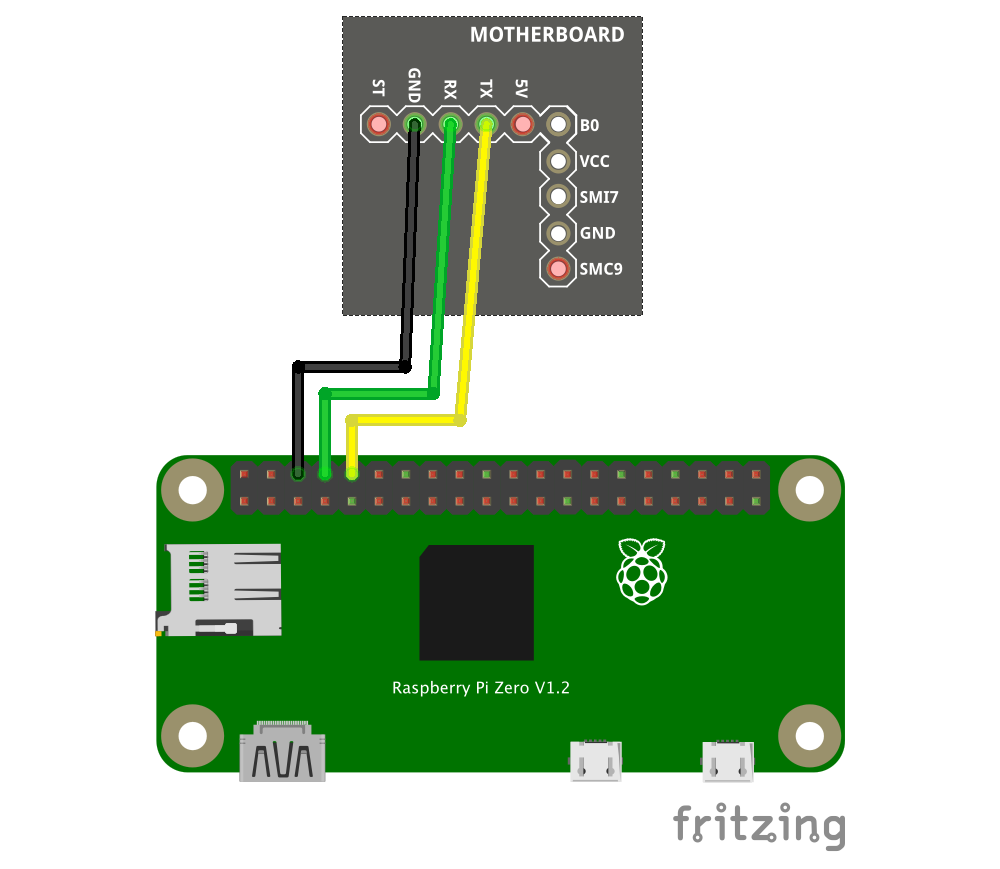
pinout.xyz is a good reference if you’re unfamiliar with the Raspberry Pi’s GPIO pins. Note that the Pi’s TX pin is connected to the motherboard’s RX pin and vice-versa.
Connecting the Pi to the printer’s USB port#
Note that the Pi has two USB connectors: the PWR IN one should be connected to your power source (again, this could be a buck converter from the printer’s 12V or an external power source).
The other port will be connected to the “USB Disk” USB port on the printer’s motherboard. This is what will allow the printer to see the files uploaded to your Pi.
Note that this USB port on the Pi is connected directly to the Pi’s 5V line. You don’t want to have that connected directly to the printer’s 5V line, otherwise you run into issues where the Pi ends up powering the printer’s motherboard (a well-known problem between Octoprint users). So you need to do one of these:
- Put some tape on the 5V line of your USB cable. This tutorial is a good reference on how to do this.
- Cut the connection between the 5V line and the USB port on the Pi. Some people online do this, but I didn’t want to do any permanent changes to my Pi.
- Use a Power BLough-R. I actually got one of these but I couldn’t make it fit inside the case of the printer easily, so I just used the tape method.
Wrapping up the hardware#
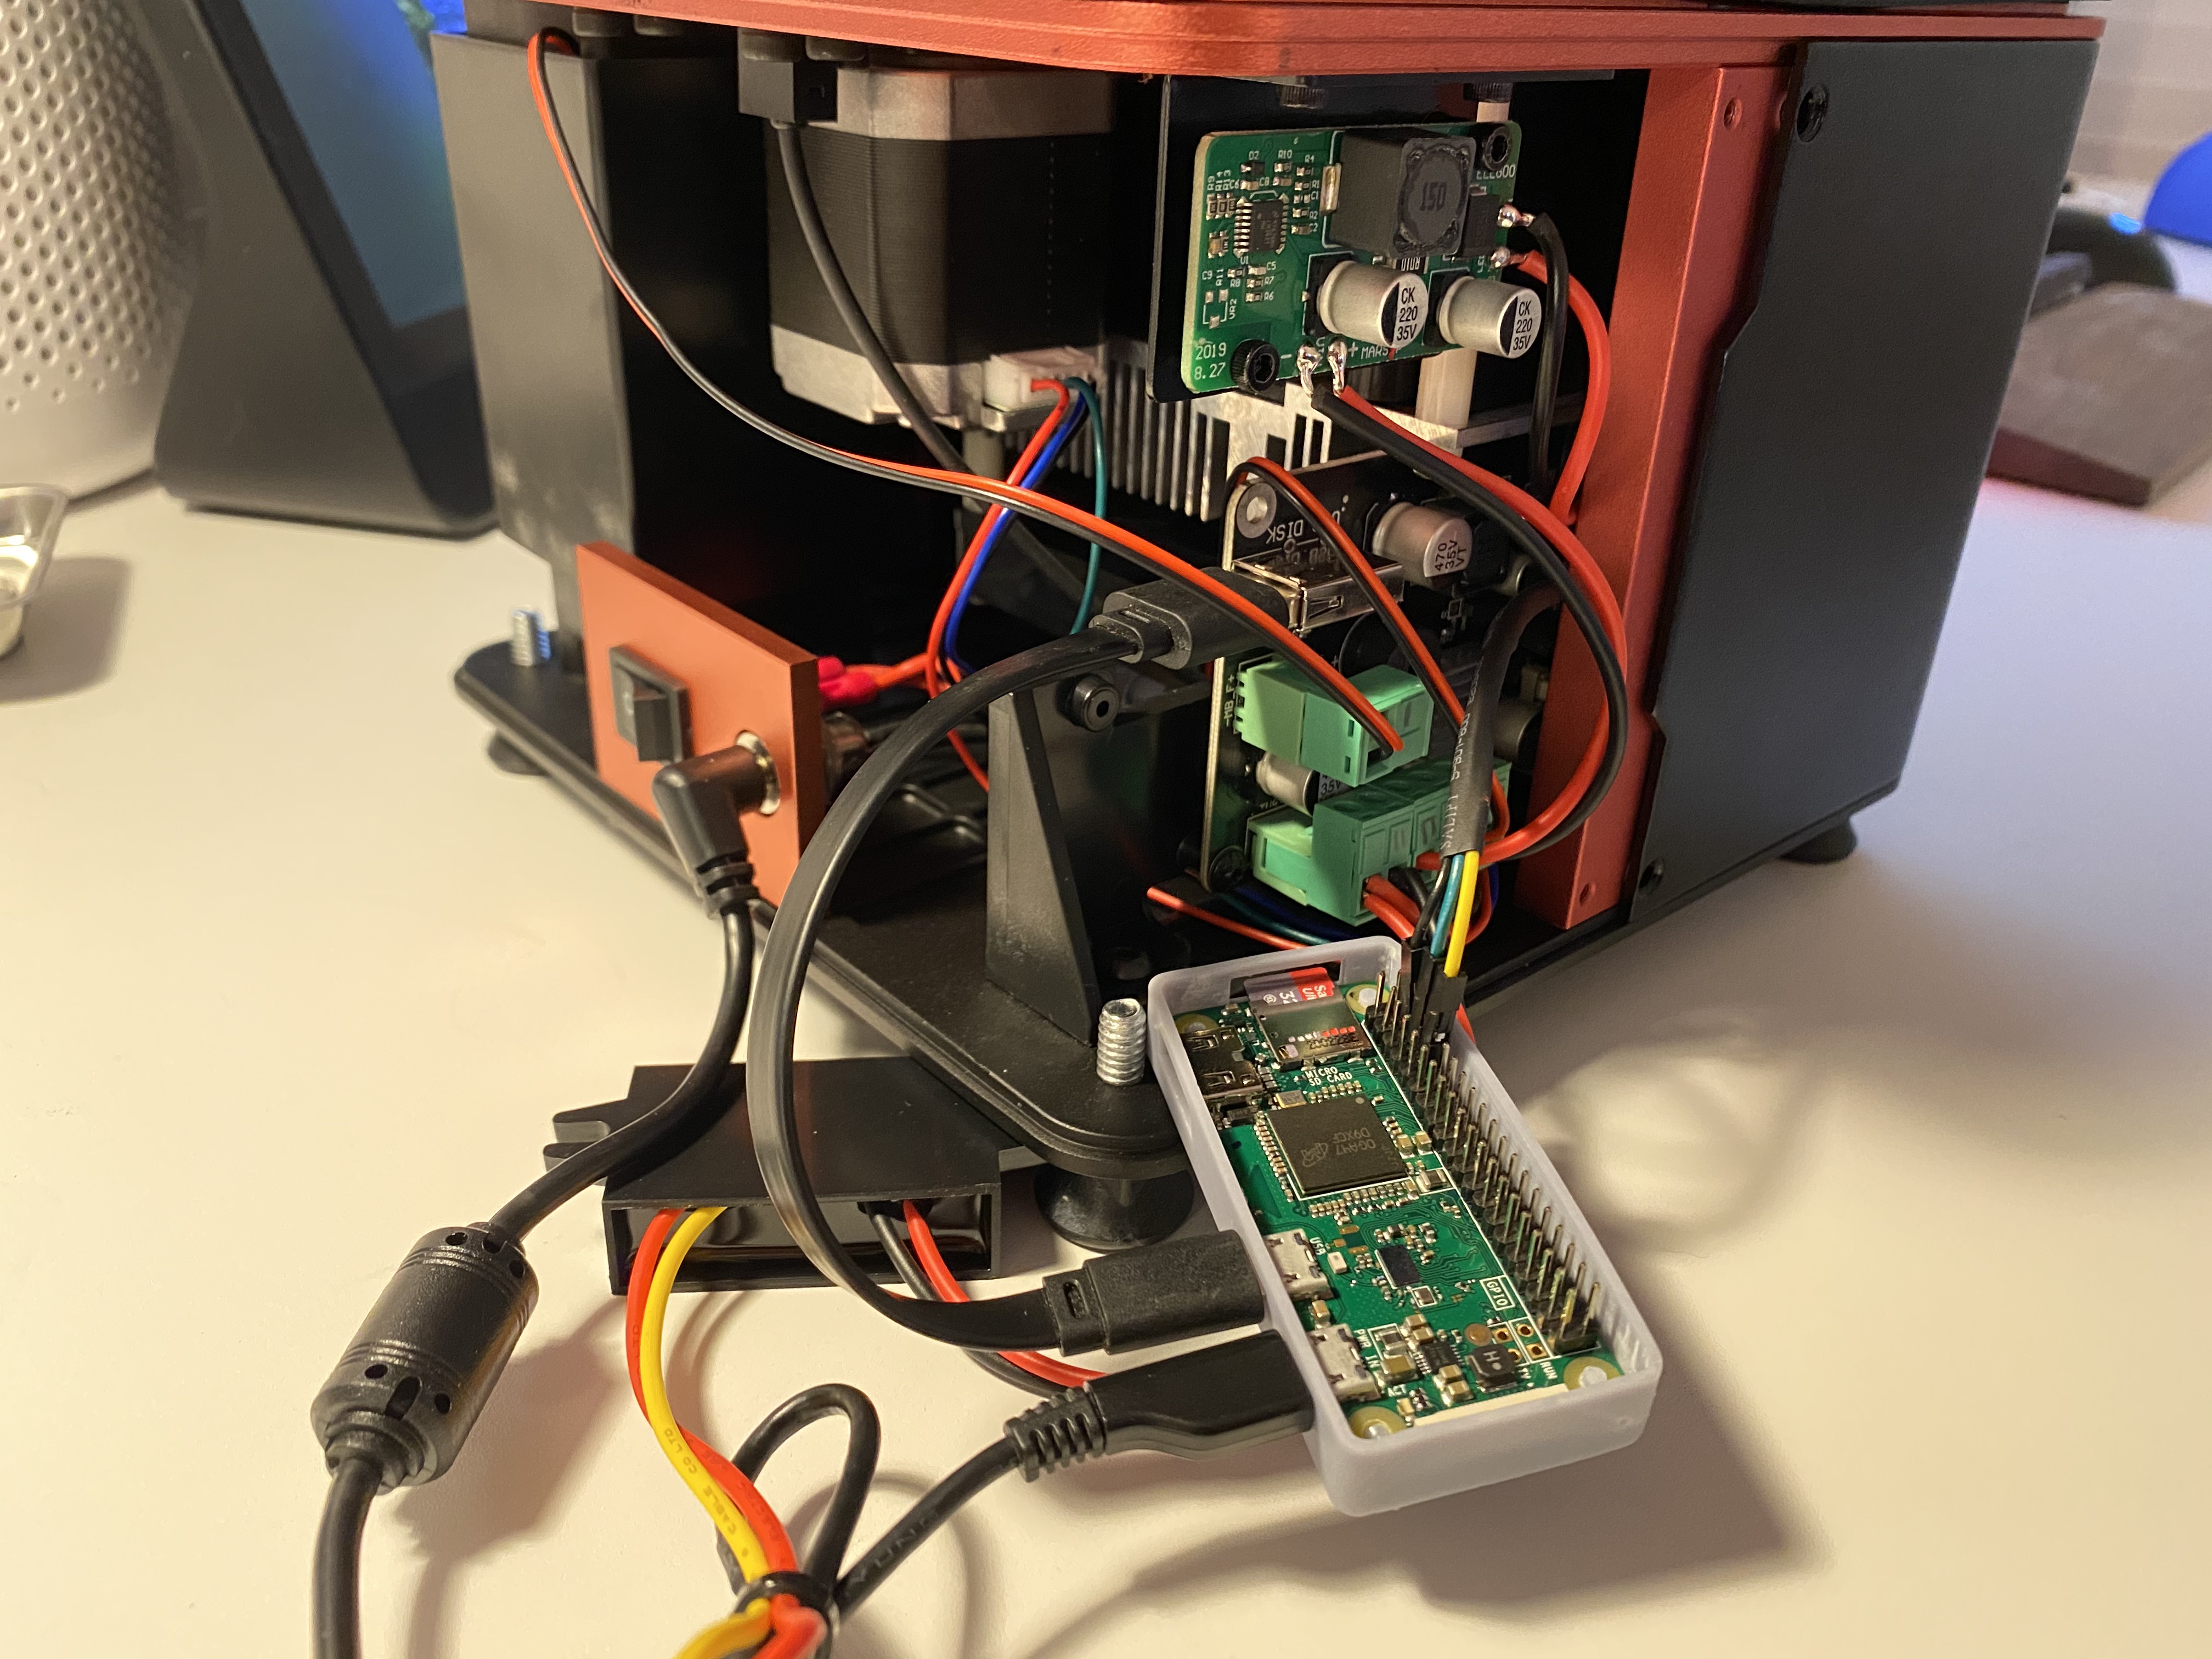
This is what my finalized build looks like:
I recommend you to setup the software and make sure things work before putting everything inside the printer and closing the case.
Setting up the software#
All the hardware should be done by now, so it’s time to setup the software!
Start by setting up Raspberry Pi OS on the SD card. Make sure to enable SSH access and setup a 2.4GHz WiFi connection, as we will be using this Pi in headless mode. There are plenty of tutorials on this online,[1][2][3] so I won’t get into those details.
Everything after this point assumes you have a working Raspberry Pi OS install with SSH access over WiFi.
Install mariner3d#
Once you’re connected to your Pi through SSH, enable my PPA repository:
$ curl -sL gpg.l9o.dev | sudo apt-key add -
$ echo "deb https://ppa.l9o.dev/raspbian ./" | sudo tee /etc/apt/sources.list.d/l9o.list
$ sudo apt update
Then install the mariner3d package:
$ sudo apt install mariner3d
Allow the printer to see files on the Pi#
mariner lets the printer access its own files by using Linux’s USB Gadget system, allowing it to act as a mass storage device.
To get this to work, first enable the USB driver for gadget modules by adding this line to /boot/config.txt:
dtoverlay=dwc2
Enable the dwc2 kernel module, by adding this to your /boot/cmdline.txt just after rootwait:
modules-load=dwc2
Setup a container file for storing uploaded files:
$ sudo dd bs=1M if=/dev/zero of=/piusb.bin count=2048
$ sudo mkdosfs /piusb.bin -F 32 -I
In this case I’m setting up a 2GB (2048MB) container. You can set up a bigger one by changing the count parameter of dd.
Create the mount point for the container file:
$ sudo mkdir -p /mnt/usb_share
Add the following line to your /etc/fstab so the container file gets mounted on boot:
/piusb.bin /mnt/usb_share vfat users,gid=mariner,umask=002 0 2
Finally, make /etc/rc.local load the g_mass_storage module by adding this to it:
#!/bin/sh -e
modprobe g_mass_storage file=/piusb.bin stall=0 ro=1
exit 0
Once you restart the pi, the printer should start seeing the contents of /mnt/usb_share. You should be able to scp files to that directory and see them on the printer.
Setting up the serial port#
In order to have the Pi talk to the printer’s motherboard, we need to setup the serial port.
First, enable UART by adding this to /boot/config.txt:
enable_uart=1
Since we will be using the Pi’s serial port, you also need to disable the Pi’s console over the serial port:
$ sudo systemctl stop serial-getty@ttyS0
$ sudo systemctl disable serial-getty@ttyS0
Lastly, remove the console from /boot/cmdline.txt by removing this from it:
console=serial0,115200
Wrapping things up#
Reboot the Pi and you will be all set. You can check that mariner is running with:
$ sudo systemctl status mariner3d
If everything is good, you should be able to access it by opening http://<pi ip address>:5000/ on your browser:
If something doesn’t work, checking the logs of mariner3d generally helps:
$ sudo journalctl -u mariner3d
That’s it! I hope this is helpful to someone. If you have questions, bugs to report or want more features on the software. Feel free to create an issue or a pull request on the GitHub project!